OpenClaw Skills Installation & Configuration Guide - Step by Step
OpenClaw Skills are modular extensions that teach the AI agent how to interact with external...
The complete guide to supercharging Google's AI-first IDE with specialized capabilities.
Google Antigravity is not just another code editor with AI autocomplete. It's an agent-first development platform where autonomous AI agents can plan, code, test, and debug entire features while you focus on high-level direction.
Think of it as "Mission Control" for AI agents that:
- Write code across multiple files
- Execute terminal commands autonomously
- Test applications in an integrated browser
- Validate their own work and iterate
The platform is built on Gemini 3 Pro and feels like VS Code, but introduces three key workspaces:
1. Agent Manager - Your command center for spawning and managing agents
2. Editor - Where you review and refine AI-generated code
3. Browser - Built-in Chrome for agents to test and interact with your app
Here's the problem: Modern AI models have massive context windows (1M+ tokens), but loading your entire codebase, documentation, and all available tools into every conversation creates context saturation. The AI gets confused, responses slow down, and costs skyrocket.
Agent Skills solve this through Progressive Disclosure:
Instead of loading everything at once, skills are packaged as modular, discoverable units. The agent initially sees only lightweight metadata (like a menu), then loads the full instructions and scripts only when relevant to your specific task.
Key Benefits:
- ⚡ Faster responses - Lean context means quicker reasoning
- 💰 Lower costs - Pay only for what you use
- 🎯 Better accuracy - No distraction from irrelevant data
- 🔧 Specialized expertise - Turn generalist AI into a specialist
Understanding these three concepts is crucial:
| Feature | Rules | Skills | Workflows |
|---|---|---|---|
| When Loaded | Always on | Agent decides when relevant | User triggers explicitly |
| Use Case | Coding standards, guidelines | Complex task procedures | Macros, shortcuts |
| Trigger | Automatic | Semantic matching | Manual (/command) |
| Example | "Always use TypeScript strict" | "How to run DB migrations" | /test to run tests |
Think of it this way:
- Rules = Always-on guardrails (company coding standards)
- Skills = On-demand expertise (debugging GitHub Actions)
- Workflows = Keyboard shortcuts (generate PR description)
Skills sit in the sweet spot: automatically activated when needed, but not cluttering your context the rest of the time.
Skills can be defined at two scopes:
your-project/
└── .agent/
    └── skills/
        ├── custom-deployment/
        │   └── SKILL.md
        └── api-tester/
            └── SKILL.md
Best for: Project-specific workflows, deployment scripts, custom frameworks
~/.gemini/antigravity/skills/
├── code-reviewer/
│   └── SKILL.md
├── git-formatter/
│   └── SKILL.md
└── json-converter/
    └── SKILL.md
Best for: General utilities you use across all projects
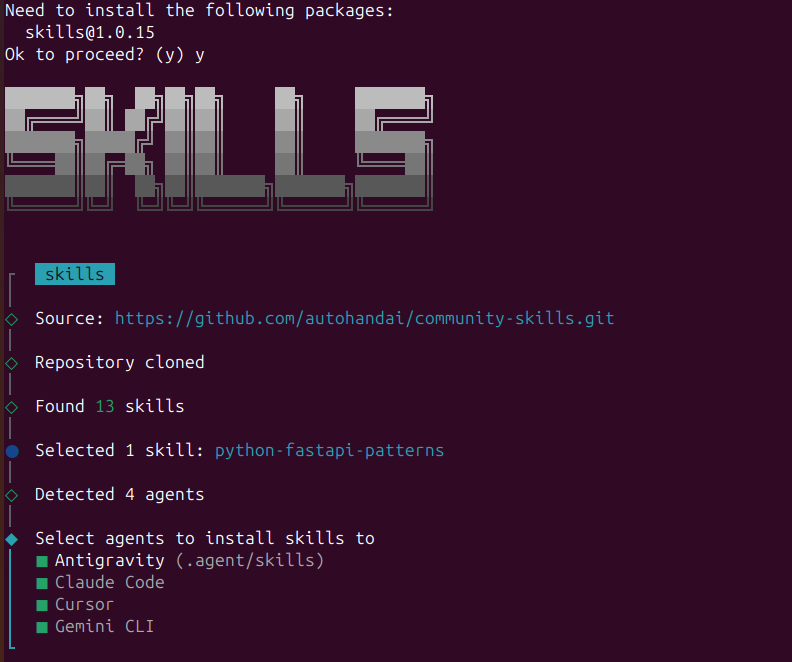
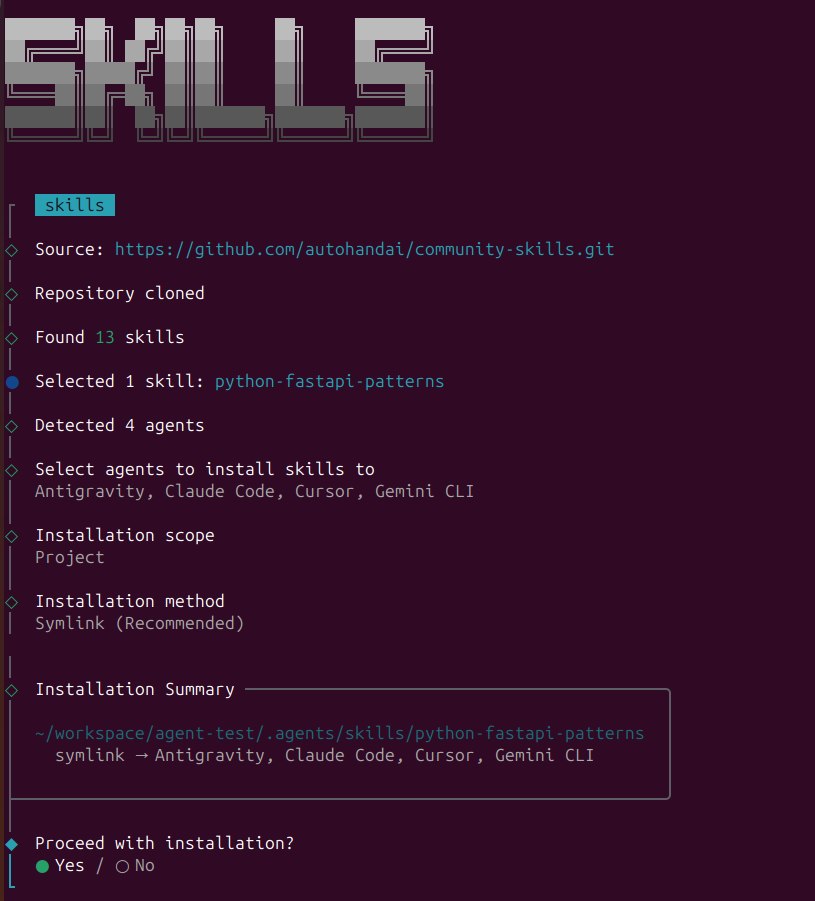
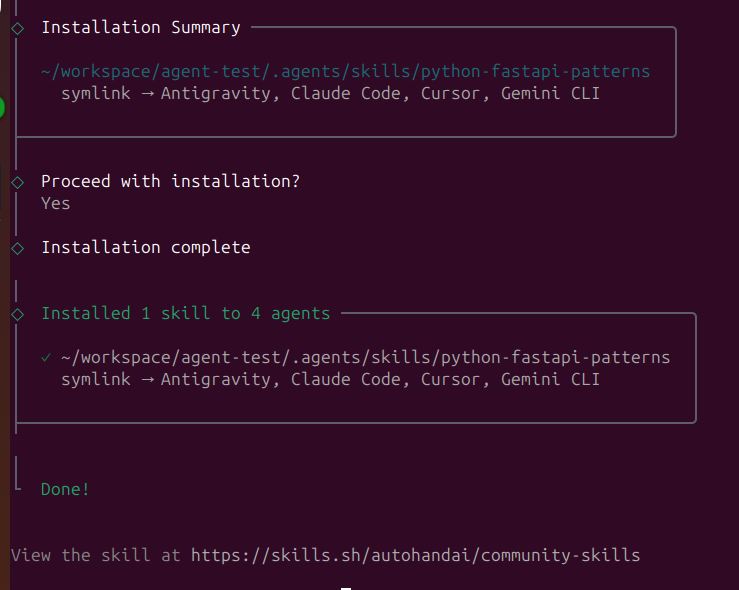
The fastest way to discover and install skills is through agentskillsrepo.com:
# Browse and install skills with one command
npx skills add <owner/repo>

# Examples:
npx skills add anthropics/skills
npx skills add anthropics/skills --skill "frontend-design"
npx skills add vercel-labs/agent-skills --skill "vercel-react-best-practices"
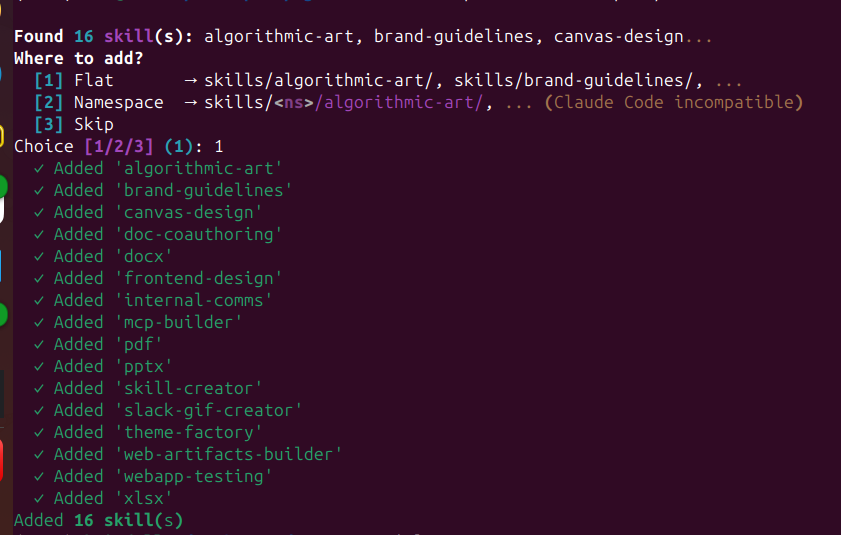
SkillPort is the easiest way to manage skills:
# Install SkillPort
pip install skillport
# or
uv tool install skillport

# Add skills from GitHub repos
skillport add anthropics/skills skills
skillport add google/antigravity-skills skills

# List installed skills
skillport list

# Update all skills
skillport update

# Validate your skills
skillport validate
Ex: skillport add anthropics/skills skills
Browse community skills and install manually:
Clone or download the skill folder
Copy to your skills directory:
# For workspace skills
cp -r skill-name your-project/.agent/skills/

# For global skills
cp -r skill-name ~/.gemini/antigravity/skills/
The marketplace offers:
- Thousands of community-created skills
- One-command installation
- Ratings and reviews
- Categorized browsing by use case
- Automatic updates
Let's build a simple skill that formats Git commit messages according to Conventional Commits.
# For workspace skill
mkdir -p .agent/skills/git-commit-formatter

# OR for global skill
mkdir -p ~/.gemini/antigravity/skills/git-commit-formatter
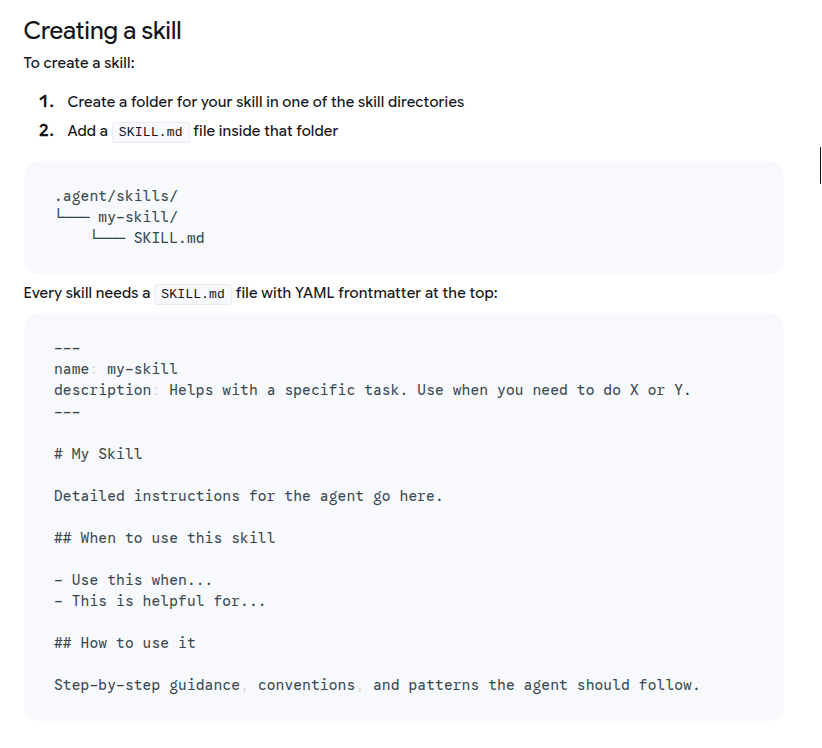
Create SKILL.md in your new directory:
---
name: git-commit-formatter
description: Formats git commit messages according to Conventional Commits specification. Use this when the user asks to commit changes or write a commit message.
---

# Git Commit Formatter Skill

When writing a git commit message, you MUST follow the Conventional Commits specification.

## Format
`<type>[optional scope]: <description>`

## Allowed Types
- **feat**: A new feature
- **fix**: A bug fix
- **docs**: Documentation only changes
- **style**: Changes that do not affect meaning (formatting, whitespace)
- **refactor**: Code change that neither fixes a bug nor adds a feature
- **perf**: Code change that improves performance
- **test**: Adding or correcting tests
- **chore**: Build process or auxiliary tool changes

## Instructions
1. Analyze the changes to determine the primary `type`
2. Identify the `scope` if applicable (e.g., specific component)
3. Write a concise `description` in imperative mood (e.g., "add feature" not "added feature")
4. If there are breaking changes, add a footer: `BREAKING CHANGE: description`

## Examples
Good: `feat(auth): implement login with google`
Good: `fix(api): handle null response from database`
Good: `docs: update installation instructions`
Bad: `wip`
Bad: `fixed stuff`
Bad: `updates`
Example output: docs: add detailed comments to demo_primes.py
The simplest skills are pure instructions with no additional files.
Use when: You just need to guide the agent's behavior with text instructions.
Example: The git-commit-formatter above
Move large static content to separate files to save context tokens.
license-header-adder/
├── SKILL.md
└── resources/
    └── HEADER_TEMPLATE.txt
SKILL.md:
---
name: license-header-adder
description: Adds the standard open-source license header to new source files.
---

# License Header Adder Skill

## Instructions
1. **Read the Template**: First, read `resources/HEADER_TEMPLATE.txt`
2. **Prepend to File**: Add the template to the top of new source files
3. **Modify Comment Syntax**:
   - For C-style languages (Java, JS, TS): Use `/* ... */`
   - For Python, Shell, YAML: Use `#` comments
   - For HTML/XML: Use `<!-- ... -->`

## When to Use
Use this when creating new `.py`, `.java`, `.js`, `.ts`, `.go` files that require copyright attribution.
Use when: You have large templates, documentation, or static content.
Show the agent examples of input→output transformations.
json-to-pydantic/
├── SKILL.md
└── examples/
    ├── input_data.json
    └── output_model.py
Why this works: LLMs are pattern-matching engines. One good example is often better than 50 lines of rules.
SKILL.md:
---
name: json-to-pydantic
description: Converts JSON data snippets into Python Pydantic data models. Use when users provide JSON and need Pydantic classes.
---

# JSON to Pydantic Skill

## Instructions
1. **Analyze the Input**: Examine the JSON structure
2. **Infer Types**:
   - `string` → `str`
   - `number` → `int` or `float`
   - `boolean` → `bool`
   - `array` → `List[Type]`
   - `null` → `Optional[Type]`
   - Nested objects → Create separate sub-class

3. **Follow the Example**: Review `examples/` to see proper structure
   - Input: `examples/input_data.json`
   - Output: `examples/output_model.py`

## Style Guidelines
- Use `PascalCase` for class names
- Use type hints (`List`, `Optional`) from `typing`
- If a field can be missing/null, default it to `None`
- Extract nested objects into their own classes
Use when: The task involves transformations that are easier to show than explain.
Let the agent execute deterministic code for complex validation or processing.
database-schema-validator/
├── SKILL.md
└── scripts/
    └── validate_schema.py
SKILL.md:
---
name: database-schema-validator
description: Validates SQL schema files for compliance with internal safety and naming policies. Use when reviewing or creating database schemas.
---

# Database Schema Validator Skill

## Policies Enforced
1. **Safety**: No `DROP TABLE` statements
2. **Naming**: All tables must use `snake_case`
3. **Structure**: Every table must have an `id` PRIMARY KEY

## Instructions
1. **Do not validate manually** - The rules are complex
2. **Run the Script**: Execute `python scripts/validate_schema.py <file_path>`
3. **Interpret Output**:
   - Exit code 0: Schema is valid
   - Exit code 1: Report the specific errors to the user

## Example
User: "Validate my schema.sql"
Agent: Runs the script, gets exit code 1 with error "Table 'users' missing primary key", reports to user.
scripts/validate_schema.py:
import sys
import re

def validate_schema(filename):
    """Validates SQL against internal policies"""
    try:
        with open(filename, 'r') as f:
            content = f.read()

        errors = []

        # Check 1: No DROP TABLE
        if re.search(r'DROP TABLE', content, re.IGNORECASE):
            errors.append("ERROR: 'DROP TABLE' statements are forbidden.")

        # Check 2 & 3: Table validation
        table_defs = re.finditer(
            r'CREATE TABLE\s+(?P<name>\w+)\s*\((?P<body>.*?)\);',
            content, re.DOTALL | re.IGNORECASE
        )

        for match in table_defs:
            table_name = match.group('name')
            body = match.group('body')

            # Snake case check
            if not re.match(r'^[a-z][a-z0-9_]*$', table_name):
                errors.append(f"ERROR: Table '{table_name}' must be snake_case.")

            # Primary key check
            if not re.search(r'\bid\b.*PRIMARY KEY', body, re.IGNORECASE):
                errors.append(f"ERROR: Table '{table_name}' missing 'id' primary key.")

        if errors:
            for err in errors:
                print(err)
            sys.exit(1)
        else:
            print("✓ Schema validation passed.")
            sys.exit(0)

    except FileNotFoundError:
        print(f"Error: File '{filename}' not found.")
        sys.exit(1)

if __name__ == "__main__":
    if len(sys.argv) != 2:
        print("Usage: python validate_schema.py <schema_file>")
        sys.exit(1)

    validate_schema(sys.argv[1])
Use when: You need deterministic validation, complex calculations, or binary operations that LLMs can't reliably perform.
Combine all patterns for complex, multi-step workflows.
adk-tool-scaffold/
├── SKILL.md
├── scripts/
│   └── scaffold_tool.py
├── resources/
│   └── ToolTemplate.py.hbs
└── examples/
    └── WeatherTool.py
Use when: Building something complex like code generators, deployment pipelines, or multi-step migrations.
Here's a production-ready skill for reviewing React code:
---
name: react-component-reviewer
description: Reviews React/Next.js components for hooks, performance, TypeScript, and accessibility issues. Use when reviewing .tsx/.jsx files or React code.
metadata:
  author: your-team
  version: "2.0"
---

# React Component Reviewer

## What This Reviews
- Server vs Client Component usage (Next.js)
- Hook dependency arrays and custom hooks
- Unnecessary re-renders and performance issues
- Missing TypeScript types or `any` usage
- Accessibility (ARIA labels, keyboard navigation)
- Prop drilling and state management

## Review Process

### 1. Component Type (Next.js)
- Should this be a Server Component?
- Is `'use client'` necessary, or can we remove it?
- Are we fetching data client-side when it could be server-side?

### 2. Hooks
- Check all `useEffect` dependency arrays
- Look for missing dependencies that could cause bugs
- Verify custom hooks follow naming conventions (`use*`)
- Check for redundant state or effects

### 3. Performance
- Are there expensive operations in render?
- Could we use `useMemo` or `useCallback`?
- Are child components wrapped in `React.memo` if needed?
- Is list rendering using proper `key` props?

### 4. TypeScript
- Are all props properly typed?
- Any `any` types that should be specific?
- Are interfaces used for complex types?
- Event handlers have proper types (`React.MouseEvent`, etc.)?

### 5. Accessibility
- All images have alt text?
- Buttons and links have proper labels?
- Interactive elements keyboard accessible?
- Proper heading hierarchy (h1 → h2 → h3)?

## Output Format

Provide feedback in these categories:

**🔴 Critical Issues** (Must fix - breaks functionality)
- List specific problems with line numbers
- Explain the impact
- Provide exact fix with code

**🟡 Performance Issues** (Impacts UX)
- Identify slow operations
- Suggest optimizations with code examples

**🔵 Best Practices** (Improves maintainability)
- TypeScript improvements
- Code organization suggestions
- Modern React patterns

**✅ Good Practices Found**
- Highlight what's done well
- This helps reinforce good patterns

## Common Patterns

### ❌ Bad: Client Component with data fetching
```typescript
'use client'
export default function Page() {
  const [data, setData] = useState(null)
  useEffect(() => {
    fetch('/api/data').then(r => r.json()).then(setData)
  }, [])
  return <div>{data?.title}</div>
}
export default async function Page() {
  const data = await fetch('/api/data', { cache: 'no-store' })
  const json = await data.json()
  return <div>{json.title}</div>
}
useEffect(() => {
  if (userId) {
    fetchUser(userId)
  }
}, []) // ❌ Missing userId dependency!
useEffect(() => {
  if (userId) {
    fetchUser(userId)
  }
}, [userId, fetchUser]) // ✅ All dependencies listed
<Parent data={data}>
  <Middle data={data}>
    <Child data={data} />
  </Middle>
</Parent>
<DataProvider value={data}>
  <Parent>
    <Middle>
      <Child /> {/* Accesses data via useData() hook */}
    </Middle>
  </Parent>
</DataProvider>
## Skill Design Best Practices

### 1. Write Killer Descriptions

The `description` field is how the agent decides when to load your skill. Make it semantic and keyword-rich.

❌ **Bad:** `description: Helps with React`

✅ **Good:** `description: Reviews React and Next.js components for hooks issues, performance problems, TypeScript errors, and accessibility violations. Use when reviewing .tsx or .jsx files, or when users ask for code review of React components.`

Include:
- What it does
- When to use it
- Keywords users might say ("review", "check", "analyze", "debug")

### 2. Keep SKILL.md Under 500 Lines

The entire file is loaded into context when activated. For longer documentation:
- Move reference material to `references/`
- Put examples in `examples/`
- Keep SKILL.md focused on the core instructions

### 3. Use Progressive Disclosure

Structure information from general to specific:
1. **Metadata** (100 tokens) - Name and description for routing
2. **Core instructions** (2000 tokens) - Main SKILL.md content
3. **Deep references** (loaded only if needed) - Separate files

### 4. Test with Real Prompts

Before committing a skill, test with actual user language:
- "Fix this bug"
- "Review my code"
- "Check if this is secure"
- "Help me deploy this"

Does your skill activate correctly? If not, improve the description.

### 5. Include Examples

Show, don't just tell:
- ✅ Bad pattern example → ✅ Good pattern example
- Input → Expected output
- Common mistakes → Correct approach

### 6. Make Scripts Self-Contained

If your skill includes scripts:
- Document dependencies at the top
- Include helpful error messages
- Handle edge cases gracefully
- Exit with meaningful codes (0 = success, 1 = failure)

### 7. Version Your Skills

Use Git to track changes. Add version info in metadata:

```yaml
---
name: my-skill
description: Does something awesome
metadata:
  version: "2.1"
  author: your-team
  last_updated: "2025-01"
---
Giving agents access to your terminal and browser is powerful but risky. Antigravity addresses this with:
When you configure Antigravity, choose a policy:
Allow List - Whitelist safe commands:
git status
git diff
npm test
python manage.py runserver
Deny List - Block dangerous commands:
rm -rf
DROP TABLE
curl *.secretserver.com
Control which domains agents can access:
github.com
stackoverflow.com
docs.python.org
# Block: malicious.com, tracking.xyz
You might wonder: when should I use Skills vs MCP (Model Context Protocol) servers?
| Feature | Agent Skills | MCP Servers |
|---|---|---|
| Purpose | Task methodology | Tool infrastructure |
| Scope | Lightweight procedures | Heavy-duty integrations |
| State | Stateless, ephemeral | Stateful, persistent |
| Examples | "How to format commits" | "Connect to PostgreSQL" |
| Load Time | On-demand | Always available |
| Best For | Workflows, standards | External systems, APIs |
Think of it this way:
- MCP = The agent's hands (tools for external systems)
- Skills = The agent's brain (knowledge of how to use them)
Example combo:
- MCP server provides github_create_pr tool
- Skill provides instructions on PR format, labels, and review process
Here's how everything works together:
User: "Deploy to production"

1. [Rule] Checks always-on guardrail: "Deployments require test passage"
2. [Skill: deployment-checker] Loads procedure for pre-deployment validation
3. [MCP: GitHub] Uses tool to check CI/CD status
4. [Skill: deployment-checker] Runs scripts/verify_tests.py
5. [MCP: AWS] Uses tool to trigger deployment
6. [Skill: deployment-checker] Monitors and reports results
7. [Rule] Logs deployment to audit trail
Skills orchestrate the tools (MCP), following guardrails (Rules).
Problem: Antigravity doesn't activate your skill
Solutions:
1. Check description - Is it semantic enough?
2. Verify file structure - Must be SKILL.md (case-sensitive)
3. Test prompt - Try explicit: "Use the [skill-name] skill to..."
4. Check location - Skills in .agent/skills/ or ~/.gemini/antigravity/skills/?
5. Validate syntax - Run skillport validate <skill-dir>
Problem: Skill loads but agent doesn't follow instructions
Solutions:
1. Be more explicit - Use imperative language ("You MUST...")
2. Add examples - Show input→output transformations
3. Add constraints - List "Do NOT" rules clearly
4. Simplify - Break complex skills into smaller steps
5. Test incrementally - Start simple, add complexity gradually
Problem: Scripts in scripts/ don't run
Solutions:
1. Check permissions - chmod +x scripts/your_script.py
2. Verify path - Use relative paths from skill root
3. Test manually - Run script outside Antigravity first
4. Check dependencies - Document required packages
5. Add error handling - Print helpful error messages
Problem: "Context window exceeded" errors
Solutions:
1. Shorten SKILL.md - Move content to references/
2. Split skills - Create multiple focused skills
3. Lazy load - Reference files only when needed
4. Remove duplication - Don't repeat common info
5. Use examples wisely - One good example beats ten mediocre ones
Here's a complete, production-ready skill for safe deployments:
---
name: production-deployment
description: Handles production deployments with safety checks, rollback procedures, and monitoring. Use when deploying to production or when users mention "deploy prod" or "release to production".
metadata:
  version: "3.0"
  author: platform-team
  requires: kubectl, aws-cli, git
---

# Production Deployment Skill

**CRITICAL**: This skill handles production deployments. Every step must be validated.

## Pre-Deployment Checklist

Before ANY deployment, verify:
1. ✅ All tests pass in CI/CD
2. ✅ Code reviewed and approved
3. ✅ Database migrations tested in staging
4. ✅ Environment variables updated
5. ✅ Rollback plan ready

## Deployment Process

### Phase 1: Validation
```bash
# Run pre-deployment checks
python scripts/pre_deploy_check.py

# Expected output: "✓ All checks passed"
# If ANY check fails, STOP and report to user
# Create database backup
python scripts/backup_database.py --env=production

# Verify backup exists
python scripts/verify_backup.py --latest
# Deploy to production
kubectl apply -f k8s/production/

# Wait for pods to be ready
kubectl wait --for=condition=ready pod -l app=main --timeout=300s
# Run critical path tests
python scripts/smoke_tests.py --env=production

# Expected: All tests pass
# If any test fails, proceed to rollback
If ANYTHING goes wrong:
# Immediate rollback
kubectl rollout undo deployment/main

# Restore database if needed
python scripts/restore_database.py --backup=<latest>

# Verify rollback
python scripts/smoke_tests.py --env=production
After deployment (success or failure), report:
- ✅/❌ Deployment status
- Duration
- Any warnings or errors
- Rollback status (if applicable)
- Next steps for user
NEVER:
- Deploy without running pre-checks
- Skip database backups
- Ignore failed smoke tests
- Deploy on Friday afternoon (seriously)
- Override safety checks without explicit user confirmation
ALWAYS:
- Create a backup before any database change
- Monitor for at least 5 minutes post-deploy
- Document any issues encountered
- Report status clearly to the user
If deployment fails catastrophically:
- Alert: #platform-emergency Slack channel
- Escalate to: [email protected]
- Incident doc: [template link]
```
npx skills addpip install skillportnpx skills add git-commit-formatterskillport add anthropics/skills skillsAgent Skills transform Antigravity from a smart autocomplete into a specialized development partner that knows your team's exact workflows, coding standards, and best practices.
The magic is in the progressive disclosure:
- Lightweight metadata for fast routing
- Full instructions loaded only when needed
- Scripts executed for complex operations
- References loaded on-demand for deep knowledge
Start simple:
1. Install 2-3 community skills
2. Test them on real tasks
3. Create one custom skill for your most repetitive workflow
4. Iterate based on what works
Skills are just markdown files and scripts. If you can document a process, you can create a skill. The agent handles the rest.
Remember: The goal isn't to replace developers—it's to free you from repetitive tasks so you can focus on the interesting problems. Skills are how you teach the agent to be your perfect teammate.
Now go build something awesome. 🚀